R408 *Bumper construction. Bumpers must be constructed as follows (see Figure 9‑7):
A. be backed by ¾ in. thick (nominal, ~19mm) by 5 in. ± ½ in. (~127 mm ± 12.7 mm) tall plywood, Oriented Strand Board (OSB) or solid wood (with the exception of balsa). Small clearance pockets to accommodate minor protrusions permitted per R101 and/or holes needed to access or recess mounting hardware in the wood backing are permitted, as long as they do not significantly affect the structural integrity of the Bumper.
¾ in. plywood and OSB refer to items sold by Vendors as that material and thickness, teams may not fabricate their own plywood or OSB. Other engineered woods such as Fiberboard or Particle Board are not likely to survive the rigors of FIRST Robotics Competition gameplay and thus not permitted per A.
Note: ¾ in. plywood is often marked according to the actual dimension (²³⁄₃₂) not the nominal size. Plywood sold as ²³⁄₃₂ meets the requirements of A.
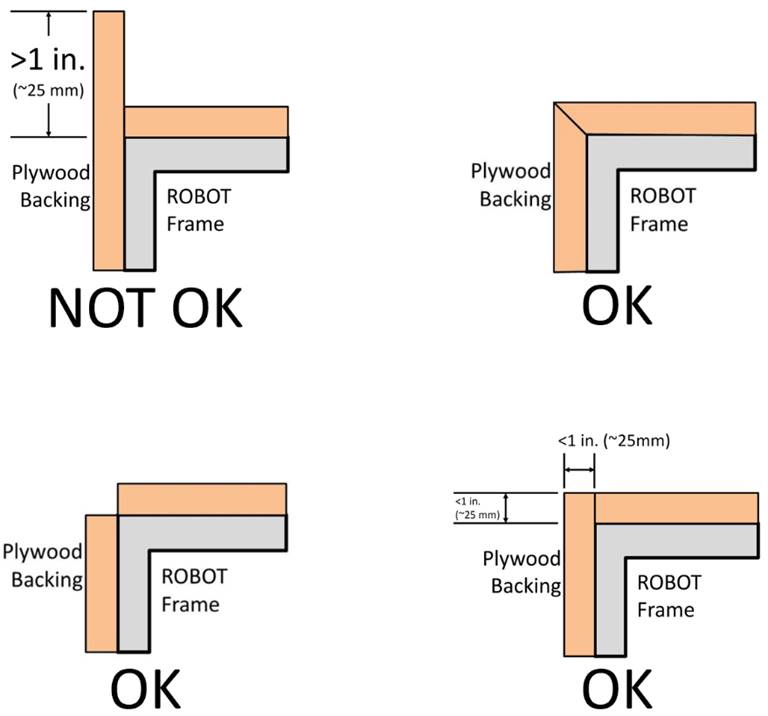
B. hard Bumper parts allowed per A, E, F, and G must not extend more than 1 in. (~25 mm) beyond the Frame Perimeter (measured as shown in Figure 9‑5).
Figure 9‑5 Hard parts of Bumper corners
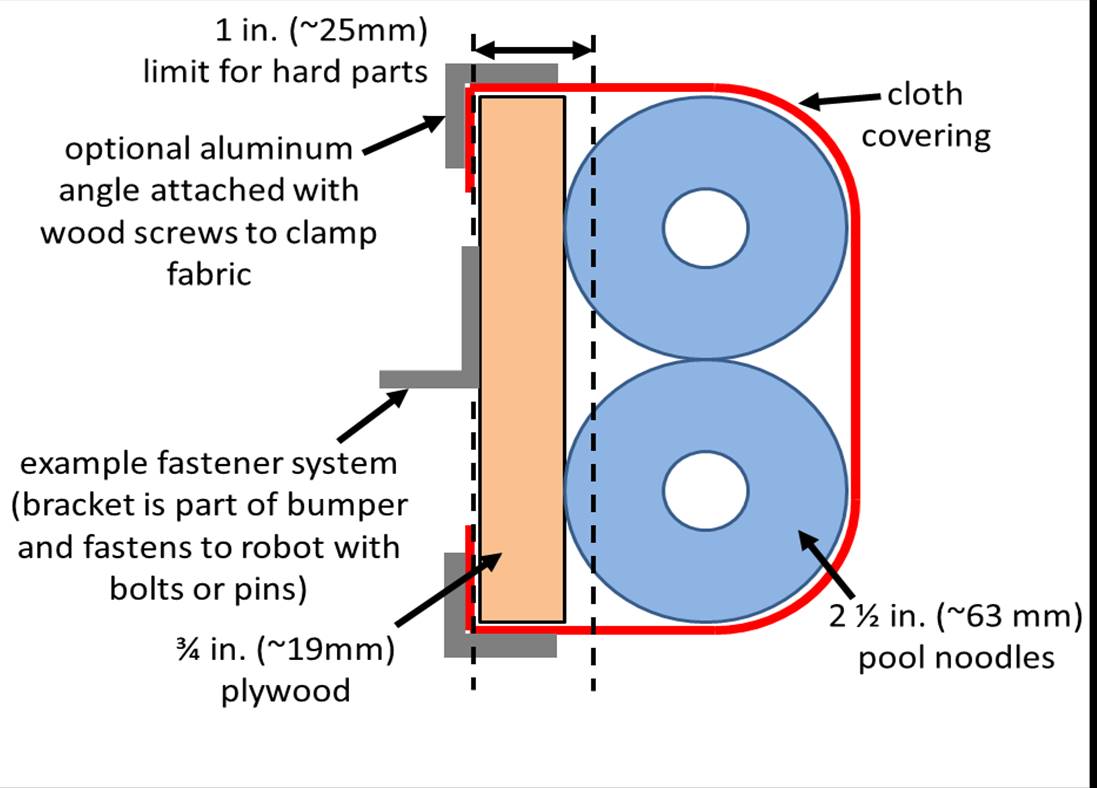
C. use a stacked pair of 2½ in. (~63 mm) round, petal, or hex pool noodles (solid or hollow) as the Bumper cushion material (see Figure 9‑7). All pool noodles used in a Bumper set (e.g. red set of Bumpers) may not be modified (with the exception of cutting to length or cutting to facilitate mating pool noodles at the corners as required by R409) or deformed and must be the same diameter, cross section, and density (e.g. all round hollow or all hex solid). Per R409 cushion material may extend beyond the end of the plywood in order to fill a corner (see Figure 9‑8). To assist in applying the fabric covering, soft fasteners may be used to attach the pool noodles to the wood backing, so long as the cross section in Figure 9‑7 is not significantly altered (e.g. tape compressing the pool noodles).
2½ in. (~63 mm) pool noodles are pool noodles either sold as 2½ in. (~63 mm) diameter or that measure between 2¼ in. (~57 mm) pool noodles and 2¾ in. (~70 mm) diameter.
All pool noodles used on a Robot must be the same in order to maintain the desired interaction between Robots in the cases of Bumper-to-Bumper contact. Bumpers containing pool noodles of vastly different construction may cause a ramp effect when interacting with other Bumpers.
Minor noodle compression as a result of smoothing Bumper fabric or rounding a Frame Perimeter corner is not considered deformed. Any compression beyond that, e.g. for the purposes of flattening the pool noodle, is deformation and a violation of C.
D. be covered with a rugged, smooth cloth with no additional coating applied by the team except for BUMPER markings permitted per R405 (multiple layers of cloth and seams are permitted if needed to accommodate R405 and/or R406, provided the cross section in Figure 9‑7 is not significantly altered).
Silk and bedding are not considered rugged cloths, however 1000D Cordura is. Tape (e.g. gaffers tape) matching the Bumper color is allowed to patch small holes on a temporary basis.
It is expected that there may be multiple layers of cloth as fabric is folded to accommodate the corners and seams of Bumpers.
The cloth must completely enclose all exterior surfaces of the wood and pool noodle material when the Bumper is installed on the Robot. The fabric covering the Bumpers must be solid in color.
E. optionally use metal angle, as shown in Figure 9‑7 or other fasteners (e.g. staples, screws, adhesives, etc.) to clamp cloth.
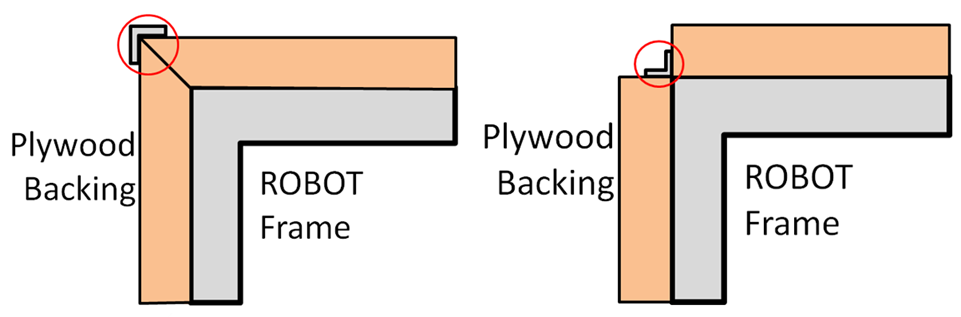
F. optionally use metal brackets (i.e. angle or sheet metal) or other fasteners (e.g. staples, screws, adhesives, etc.) to attach Bumper segments to each other (see Figure 9‑6).
Figure 9‑6 Example uses of brackets in Bumper corners
G. must attach to the Frame Perimeter of the Robot with a rigid fastening system to form a tight, robust connection to the main structure/frame (e.g. not attached with hook-and-loop tape, tape, or cable ties). The attachment system must be designed to withstand vigorous game play. All removable fasteners (e.g. bolts, locking pins, pip-pins, etc.) will be considered part of the Bumpers.
Figure 9‑7 Bumper vertical cross section